

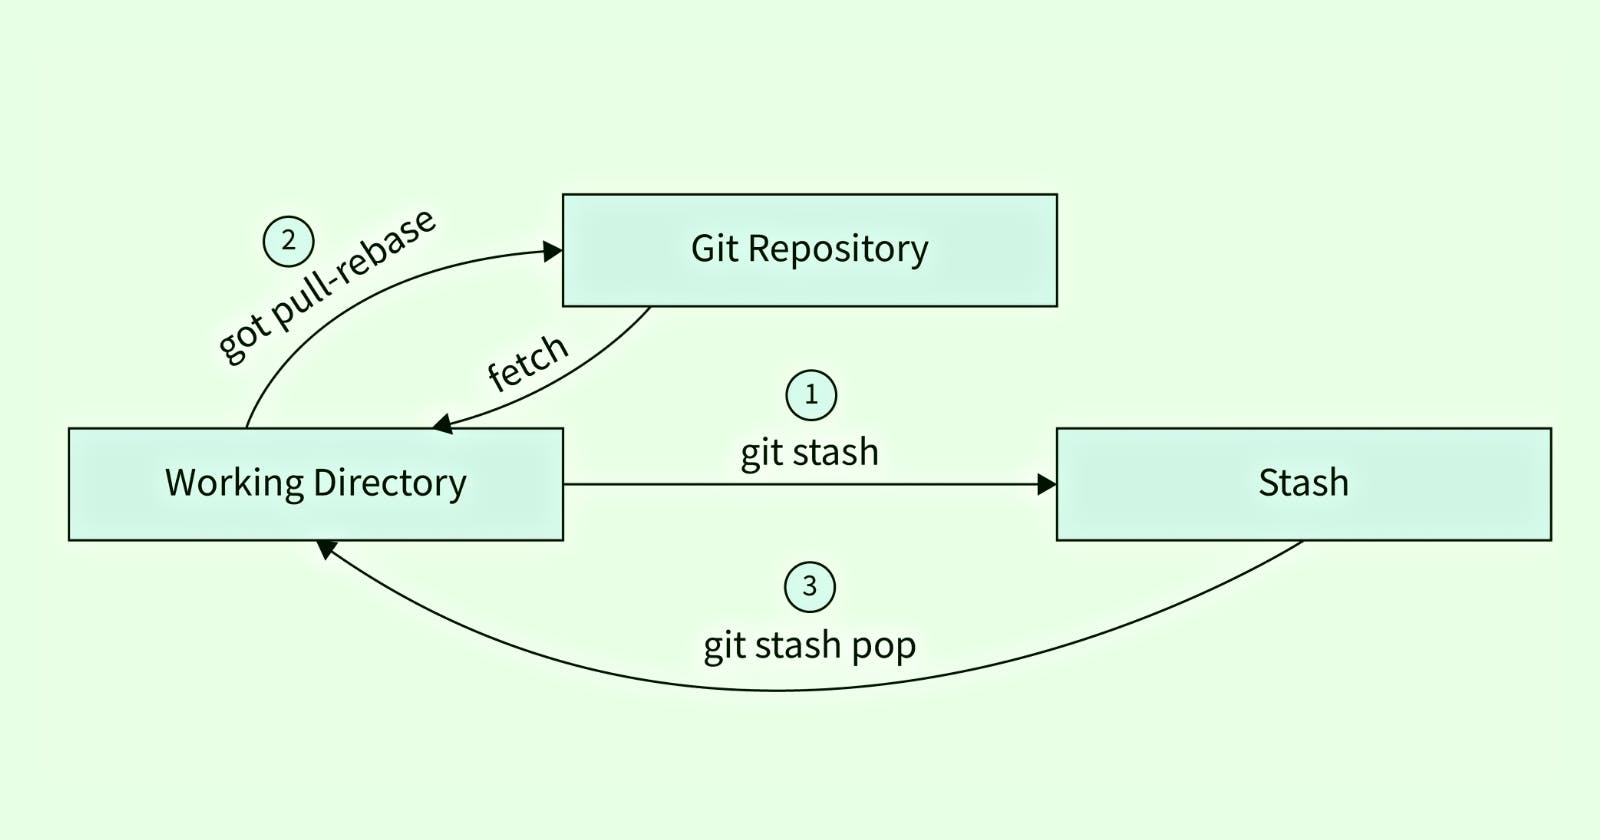
Git Stash
Git stash allows developers to save changes in a temporary location, which can be retrieved later. This feature can be useful when you need to switch to another branch or work on a different task.
Imagine you are working on a project with multiple branches, and you need to switch to another branch to work on a critical bug fix. However, you have unfinished changes on your current branch that you don't want to commit yet. You could create a new branch or commit the changes, but that could create unnecessary clutter in your repository. This is where Git stash comes in handy.
Here are the common Git stash commands that developers use:
create a stash
The git stash command saves the changes in the working directory to a stash. This command can be executed in any Git repository and does not require any arguments.
$ git stash
Saved working directory and index state WIP on master: 5a5a86c Add new feature
By default, git stash stores (or "stashes") the uncommitted changes (staged and unstaged files) and overlooks untracked and ignored files. Usually, you don't need to stash untracked and ignored files, but sometimes they might interfere with other things you want to do in your codebase.
You can use additional options to let git stash take care of untracked and ignored files:
git stash -uorgit stash --include-untrackedstash untracked files.git stash -aorgit stash --allstash untracked files and ignored files.
Listing your stashes
The git stash list command lists all the stashes available in the repository. This command is useful when you want to see all the stashes you have created.
$ git stash list
stash@{0}: WIP on master: 5a5a86c Add new feature
stash@{1}: WIP on master: 3c7eb27 Fix bug
In the example above, we executed the git stash list command, and Git listed all the stashes available in the repository. Git displayed the stash index, the message, and the commit hash.
Retrieving stashed changes
You can reapply stashed changes with the commands git stash apply and git stash pop. Both commands reapply the changes stashed in the latest stash (that is, stash@{0}). A stash reapplies the changes while pop removes the changes from the stash and reapplies them to the working copy. Popping is preferred if you don't need the stashed changes to be reapplied more than once.
You can choose which stash you want to pop or apply by passing the identifier as the last argument:
$ git stash pop stash@{1}
or
$ git stash apply stash@{1}
Cleaning up the stash
The git stash drop command removes a stash from the stash list. This command can be useful when you want to remove a stash that you no longer need.
$ git stash drop stash@{1}
or
git stash clearempties the stash list by removing all the stashes.
Git Cherry-pick
Git cherry-pick is a feature that allows you to apply a specific commit from one branch and apply it to another branch. This is useful when you want to apply a specific change from one branch to another without merging the entire branch.
syntax:
git cherry-pick <Commit1> <Commit2> <...>
Here's an example to demonstrate how Git cherry-pick works:
Suppose you have two branches named feature and master. The feature branch has a commit with changes you want to apply to the master branch. Here are the steps you would take to apply those changes:
Make sure you are on the
masterbranch:$ git checkout masterUse the
git logcommand to find the commit hash of the commit you want to cherry-pick:$ git log commit c08d18c92abf10e79d75d988039f21de95c1e9b4 Author: John Doe <johndoe@example.com> Date: Wed Feb 24 15:35:45 2021 -0500 Add new feature commit 13c4e2d02f3c8890aa149cbcc9d9f1e29c8dcf7a Author: John Doe <johndoe@example.com> Date: Tue Feb 23 10:12:09 2021 -0500 Fix typo in readme fileUse the
git cherry-pickcommand to apply the commit from thefeaturebranch to themasterbranch:$ git cherry-pick c08d18c92abf10e79d75d988039f21de95c1e9b4This will apply the changes from the commit
c08d18c92abf10e79d75d988039f21de95c1e9b4to themasterbranch.
Let's understand this visually:
As you can see there are two branches: feature and main. If we want to apply only C2 and C5 commit from the feature branch to main branch then we will use cherry-pick:
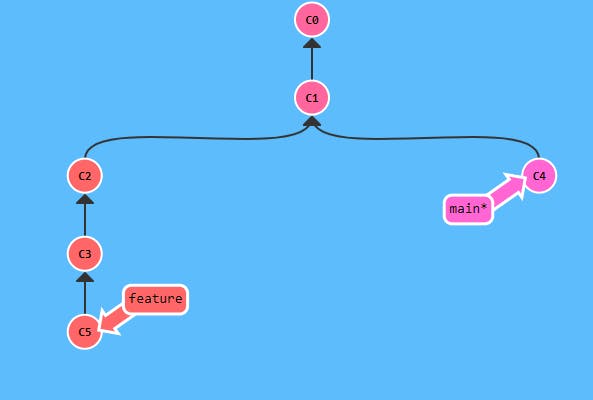
git cherry-pick C2 C5 //C2 and C5 are commit ID

Git submodules
Git submodules allow you to include another Git repository as a subdirectory within your own Git repository. This can be useful when you want to use a third-party library or framework within your own project while keeping the code for each project separate.
Here is an example of how to use the git submodule command:
First, navigate to the root directory of your Git repository where you want to add the submodule.
Use the
git submodule addcommand followed by the URL of the Git repository you want to add as a submodule. For example, if you want to add the "SubmoduleExample" repository as a submodule, you would run the following command:
git submodule add https://github.com/username/SubmoduleExample.git
Once you have added the submodule, you will see a new file called
.gitmodulesin your root directory. This file contains the configuration for the submodule.To clone the submodule code into your repository, run the following command:
git submodule update --init --recursive
This command will download the submodule code and checkout the appropriate commit.
Git Worktree
The git worktree command allows you to maintain multiple working trees for a single Git repository, which can be useful for working on multiple branches or pull requests simultaneously.
- Create a new worktree for the branch using the
git worktree addcommand. This command will create a new directory where you can work on the new branch.
git worktree add ../new-worktree new-branch
In this example, the new worktree will be created in a directory named new-worktree located in the parent directory of your current directory. You can specify any directory path you want.
- Navigate to the new worktree directory and make changes to the branch as usual.
cd ../new-worktree
# make changes to files
git add .
git commit -m "made changes to new-branch"
- To remove the worktree when you're done, use the
git worktree removecommand.
cd ..
git worktree remove new-worktree
This will remove the worktree and delete the directory.
Git blame
The git blame command allows you to see who last modified each line of a file and when the change was made. This can be useful for identifying who made a particular change to a file, or for understanding how a file has evolved over time.
- Run the
git blamecommand followed by the filename. For example:
git blame myfile.txt
- This will display a list of each line in the file, along with the commit hash, author, and date for the last modification to that line. Here's an example output:
abcdefg (kunal 2022-03-01 12:34:56 -0500 1) This is line 1 of myfile.txt
hijklmn (Jane 2022-03-02 09:12:34 -0500 2) This is line 2 of myfile.txt
abcdefg (John 2022-03-01 12:34:56 -0500 3) This is line 3 of myfile.txt
Git Tag
The git tag command allows you to create, list, and delete tags in a Git repository. A tag is a way to mark a specific commit in your repository with a name, making it easier to reference that commit later.
- Create a new tag using the
git tagcommand followed by the tag name and the commit hash.
git tag v1.0.0 4d65b8f
In this example, we're creating a new tag called v1.0.0 for the commit with hash 4d65b8f.
- List all tags in your repository using the
git tagcommand without any arguments.
git tag
This will list all tags in your repository in alphabetical order.
- List detailed information about a specific tag using the
git showcommand followed by the tag name.
git show v1.0.0
This will show detailed information about the v1.0.0 tag, including the commit hash, author, date, and commit message.
- Delete a tag using the
git tagcommand with the-doption followed by the tag name.
git tag -d v1.0.0
This will delete the v1.0.0 tag from your repository.
Thank you for reading! Hope you find this article helpful.
~Kunal